


Available from:
Aliexpress.com
Manufacturer:
Sinilink.com
Install method:
USB to Serial
| GPIO # | Component |
|---|---|
| GPIO00 | Led 1 |
| GPIO01 | None |
| GPIO02 | Led 2 |
| GPIO03 | None |
| GPIO04 | None |
| GPIO05 | PWM 1 |
| GPIO09 | Button 1 |
| GPIO10 | Button 2 |
| GPIO12 | I2C SCL 1 |
| GPIO13 | I2C SDA 1 |
| GPIO14 | None |
| GPIO15 | None |
| GPIO16 | Button 3 |
| GPIO17 | None |
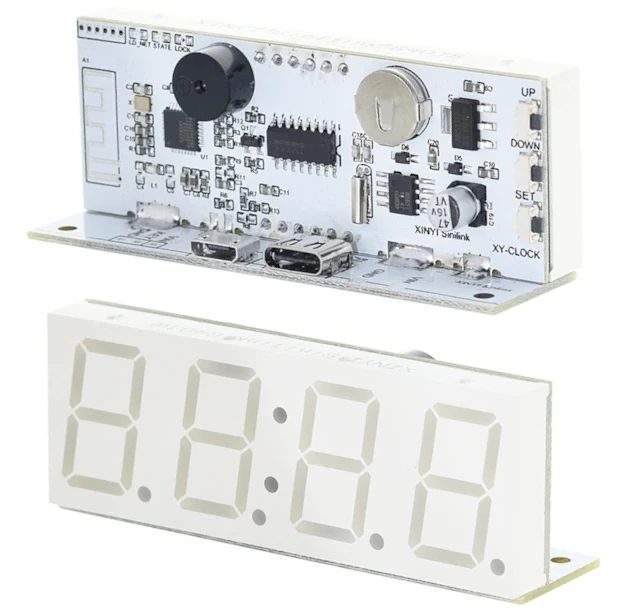
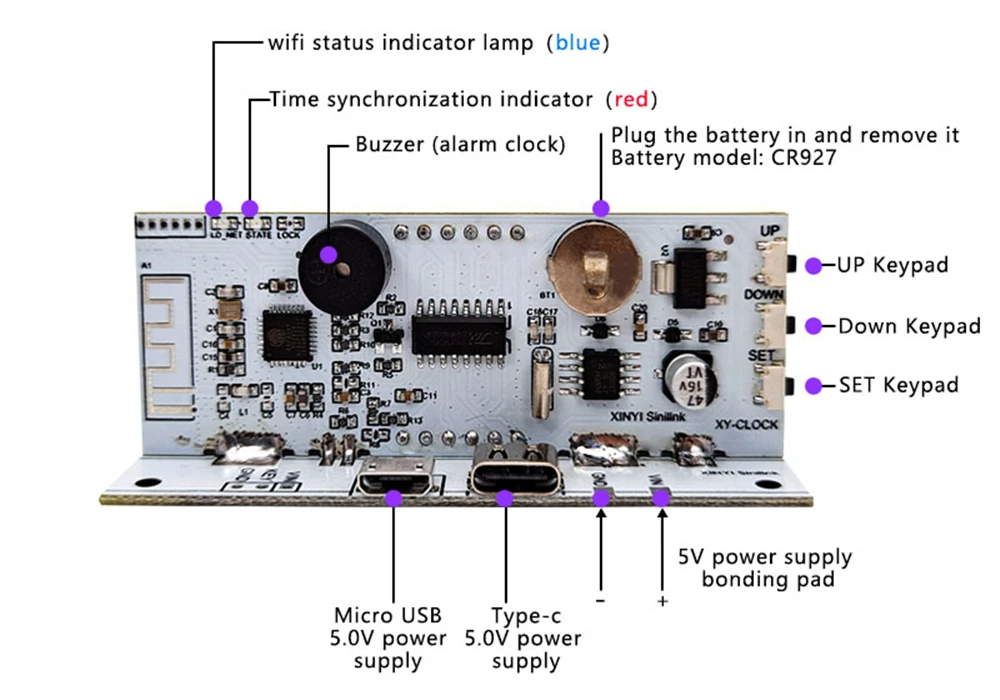
{"NAME":"XY-Clock","GPIO":[288,0,289,0,0,416,32,33,608,640,0,0,34,0],"FLAG":0,"BASE":18}Device Specs
- ESP Chips: ESP8285
- Display driver: TM1650
- RTC: DS1307Z+ (compatible with DS3231)
- Switch: 3 button + 1 key (on PCB)
- Leds: 1 blue, 1 red
- Buzzer
- Battery model: CR927
- Size: 27(h) x 72(w) x 21(d) mm
Binaries
There are no prebuilt Tasmota binaries with TM1650 display support, so Tasmota must be compiled manually with the correct flag for this functionality to be present. Instructions for this can also be found in Tasmota documentation.
You must compile your own firmware adding to user_config_override.h:
#ifndef USE_I2C
#define USE_I2C
#endif

#ifndef USE_RTC_CHIPS
#define USE_RTC_CHIPS
#endif
#ifndef USE_DS3231
#define USE_DS3231
#endif

#ifndef USE_DISPLAY
#define USE_DISPLAY
#endif
#ifndef USE_DISPLAY_MODES1TO5
#define USE_DISPLAY_MODES1TO5
#endif
#ifndef USE_DISPLAY_TM1650
#define USE_DISPLAY_TM1650
#endif
Flashing
Flashing requires soldering the GPIO0, TX, RX, GND and VCC wires for your FTDI adapter. GPIO0 must be connected to ground for flash mode, and can be left connected during the entire procedure. Note: you must use 3.3v (you will destroy the chip if is in 5v mode)
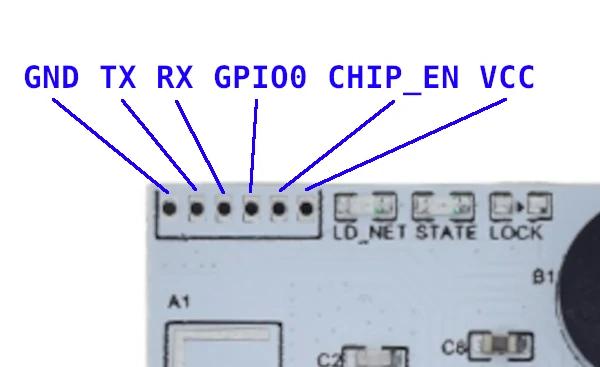
You need to connect the FTDI to the board in the following way:
| Pin | Function | FTDI |
|---|---|---|
| 1 | GND | GND |
| 2 | TX | RX |
| 3 | RX | TX |
| 4 | GPIO0 | GND (when flashing firmware) |
| 5 | CHIP_EN | |
| 6 | VCC | VCC |
GPIOs list
| GPIO | Usage |
|---|---|
| GPIO0 | LED (blue) |
| GPIO2 | LED (red) |
| GPIO5 | Buzzer PWM (1) |
| GPIO9 | Button “K_DOWN” |
| GPIO10 | Button “K_UP” |
| GPIO12 | I2C SCL |
| GPIO13 | I2C SDA |
| GPIO14 | Contact “KEY” |
| GPIO15 | Button “K_SET” |
Usage
Set the display model etc. by using console with those commands:
displaymodel 20
displaytype 0
displaymode 1        // to show the time
displaydimmer 50     // to set display brightness. Works from 0 to 100 in 8 steps ...