


Available from:
Itead.cc
Aliexpress.com
Banggood.com
Domadoo.fr
Amazon.de
Manufacturer:
Itead.cc
Install method:
USB to Serial
| GPIO # | Component |
|---|---|
| GPIO00 | None |
| GPIO01 | None |
| GPIO02 | None |
| GPIO03 | None |
| GPIO04 | Output Lo |
| GPIO05 | None |
| GPIO09 | None |
| GPIO10 | None |
| GPIO12 | None |
| GPIO13 | None |
| GPIO14 | Button 1 |
| GPIO15 | None |
| GPIO16 | None |
| GPIO17 | None |
| GPIO18 | None |
| GPIO19 | Relay 2 |
| GPIO20 | None |
| GPIO21 | Buzzer |
| GPIO22 | Relay 1 |
| GPIO23 | User |
| GPIO24 | None |
| GPIO25 | None |
| GPIO26 | None |
| GPIO27 | Button 2 |
| GPIO6 | None |
| GPIO7 | None |
| GPIO8 | None |
| GPIO11 | None |
| GPIO32 | None |
| GPIO33 | None |
| GPIO34 | None |
| GPIO35 | None |
| GPIO36 | None |
| GPIO37 | None |
| GPIO38 | ADC Temp |
| GPIO39 | None |
{"NAME":"NSPanel","GPIO":[0,0,0,0,3872,0,0,0,0,0,32,0,0,0,0,225,0,480,224,1,0,0,0,33,0,0,0,0,0,0,0,0,0,0,4736,0],"FLAG":0,"BASE":1,"CMND":"ADCParam1 2,11200,10000,3950 | Sleep 0 | BuzzerPWM 1"}BLAKADDER when buying from itead.cc for a 10% discount.

Review, full teardown and protocol decoding.
Serial Flashing
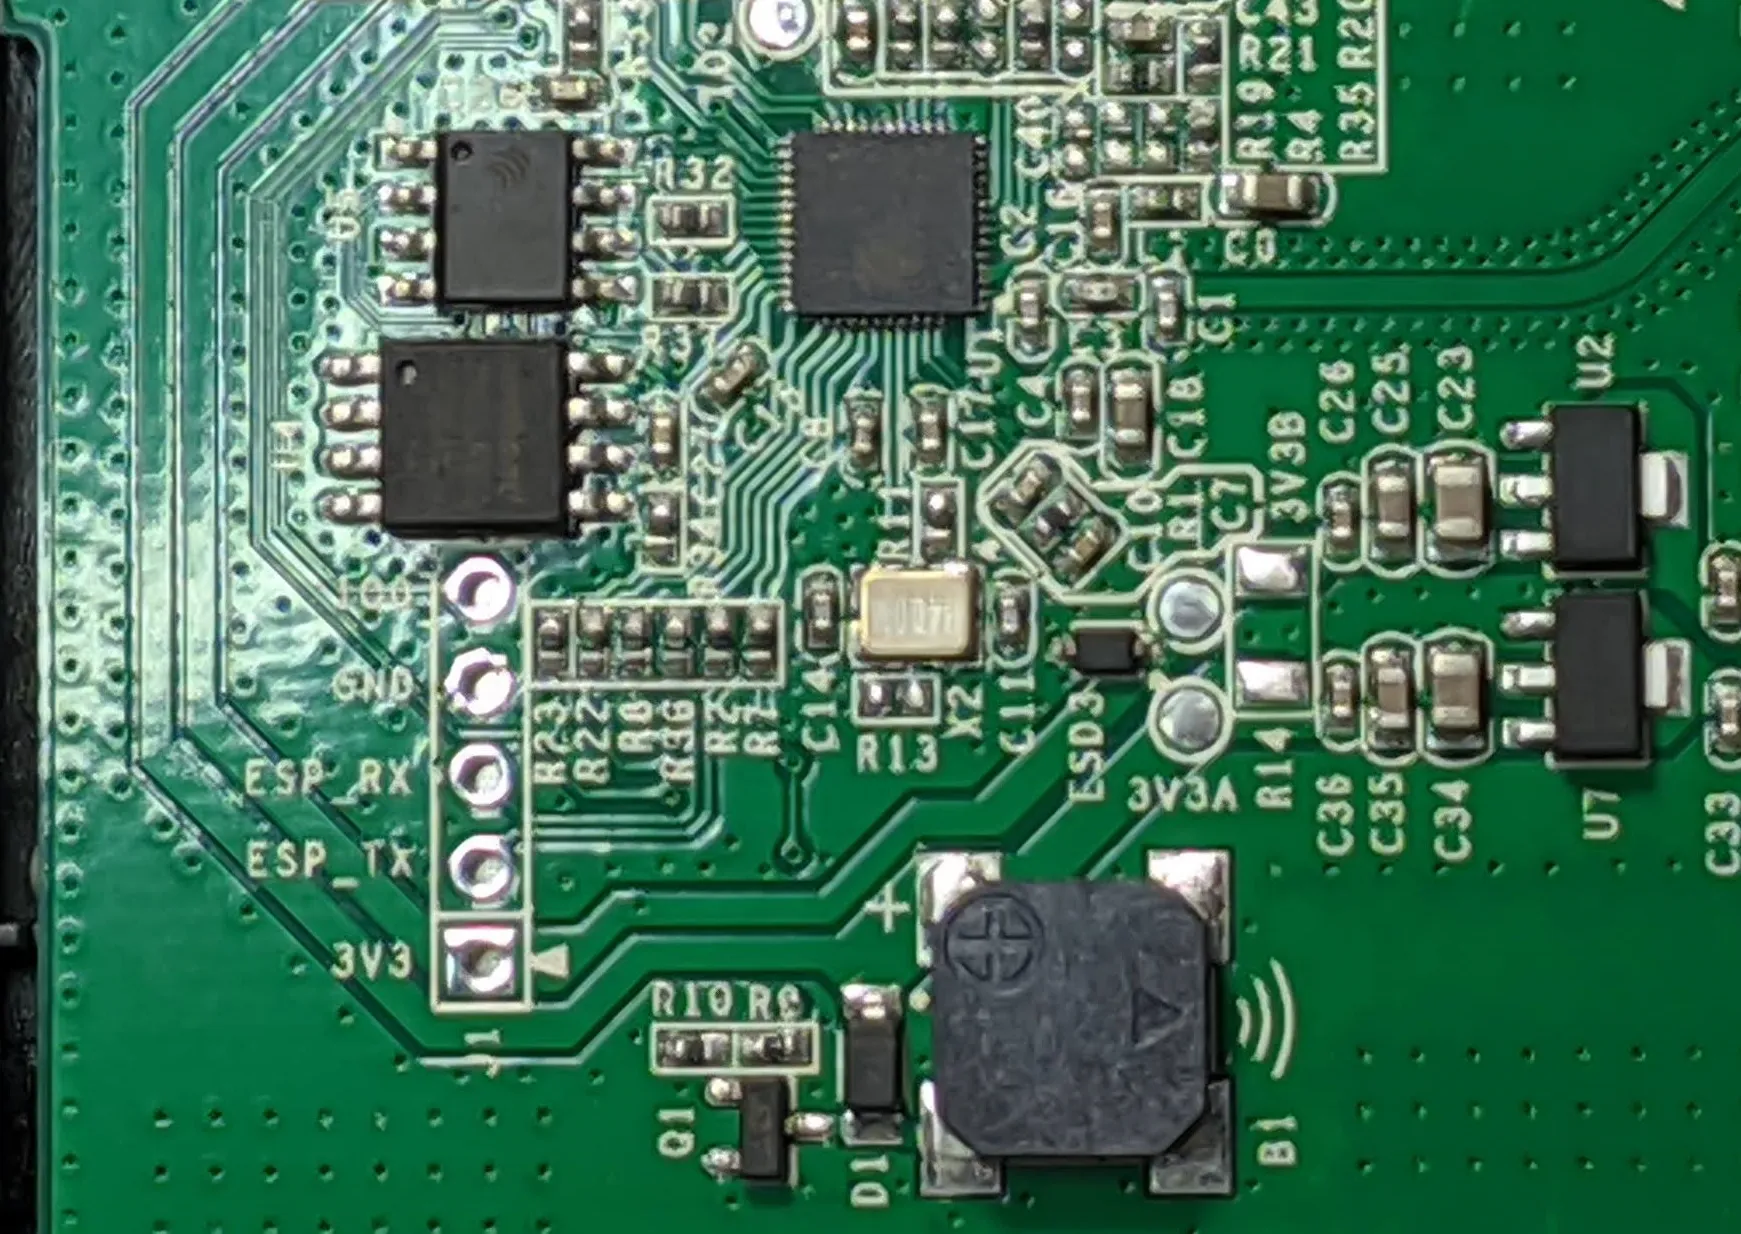
Unclip the panel from the base. Remove two bottom screws and lift the plastic cover.
The five needed pins (3V3, RX, TX, GPIO0 and GND) can be easily identified.
Download and flash tasmota32-nspanel.factory.bin or preferably install using Tasmota Web Installer.
If using standard Tasmota32 builds: Current implementation of serial in Arduino core has a bug which can boot loop the device on soft reset. Power cycling the device solves the issue. PSRAM is also not supported.
Configuration
After the flash is complete disconnect the 3.3V power and either power the touch plate using its base or connect to 5V power using the headers.
Apply the template and make sure “Module 0” is selected. The template will apply some of the commands required.
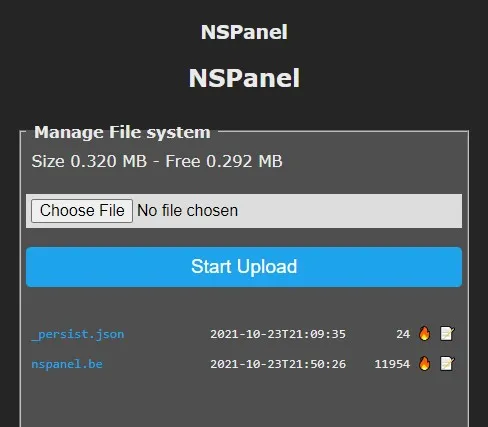
Download the NSPanel driver file nspanel.be. Navigate to Consoles - Manage File system in the web UI. Upload the driver to NSPanel with “Choose file” followed by “Start Upload”.
To load the driver on startup:
- Create and edit new file named
autoexec.bewith a lineload("nspanel.be") - change the filename to
autoexec.be(seems this is not working correctly on Tasmota v10)
Screen Commands
To control and communicate with the screen, driver introduces new commands and parsing of the NSPanel protocol. NSPanel protocol is documented here (all updates are welcome).
NSPSend
To control the switch GUI the NSPSend command is introduced
NSPSend <json_payload> sends a command to the screen using NSPanel protocol
NSPSend2 <nextion_command> sends a command to the screen using Nextion protocol. This requires the screen to be in “Nextion mode” with command NSPMode 1.
NSPMode
NSPMode command switches the command mode of the screen. Command with no payload returns the current state.
0 is the default NSPanel protocol. Screen is always in 0 on startup.
1 puts the screen in Nextion command mode. When the screen is in this mode NSPanel commands will not work.
The code might not be 100% reliable and state tracking might fail
NSPDim
NSPDim is used to turn on the “Energy-saving mode”. Value is stored in _persist.json
0 is the default where the screen stays on permanently but dimmed.
1 turns on the Energy-saving mode in which screen turns off after the set timeout period.
NSPLocation
NSPLocation <name> to set location used for weather forecasts. Value is stored in _persist.json.
Location can be a name or latitude and longitude with 2 decimals max. Example: North Pole or 64.75,-147.34. Check whether your location works with https://wttr.in/Location, if not use the coordinates.
If you don’t set it it’ll show North Pole forecast.
Features
Both relays and buttons, buzzer and temperature sensor are a part of Tasmota just like any standard switch.
Use Buzzer command to control the buzzer.
To set which widgets to draw and thermostat settings you need to edit the nspanel.be file variables “widget” and “atc”.
Relay states are reflected on the main screen bottom bars using set_power() in the driver.
Time and date will update automatically each minute according to Tasmota time using set_clock().
Weather updates will use NSPLocation value using function set_weather() to fetch data from wttr.in. Since it currently cannot provide date range I winged it by using Feelslike temperature.
Indoor temperature will update on TelePeriod using the NSPanel temperature probe data with set_temp() functions. You can change the source by commenting out associated tasmota.add_rule triggers or update remotely with NSPSend {"temperature":24.5,"tempUnit":"C"}.
Every touch event will be reported in Tasmota logs and can be used in rules with trigger NSPanel#...
If you want the option to reset the screen change GPIO4 to “Relay 3”. This pin need to be low for the screen to turn on so set PulseTime3 2 to temporarily pull it high just enough for the screen to reset.
Use Example
When turning on thermostat toggle object Tasmota receives tele/nspanel/RESULT = {"NSPanel":{"ATCEnable":1}} command in logs. This can be used in a rule:
Rule1 on NSPanel#ATCEnable do Publish cmnd/heater/Power1 %value% endon
When triggered, the rule will send a Power command to the heater switch with Tasmota with the value of the toggle object.
To mirror the state of the heater with the screen you can create a rule on the heater switch to send updates to the screen with:
rule1 on power1#state do cmnd/nspanel/nspsend {"ATCEnable":%value%} endon`