


Available from:
Aliexpress.com
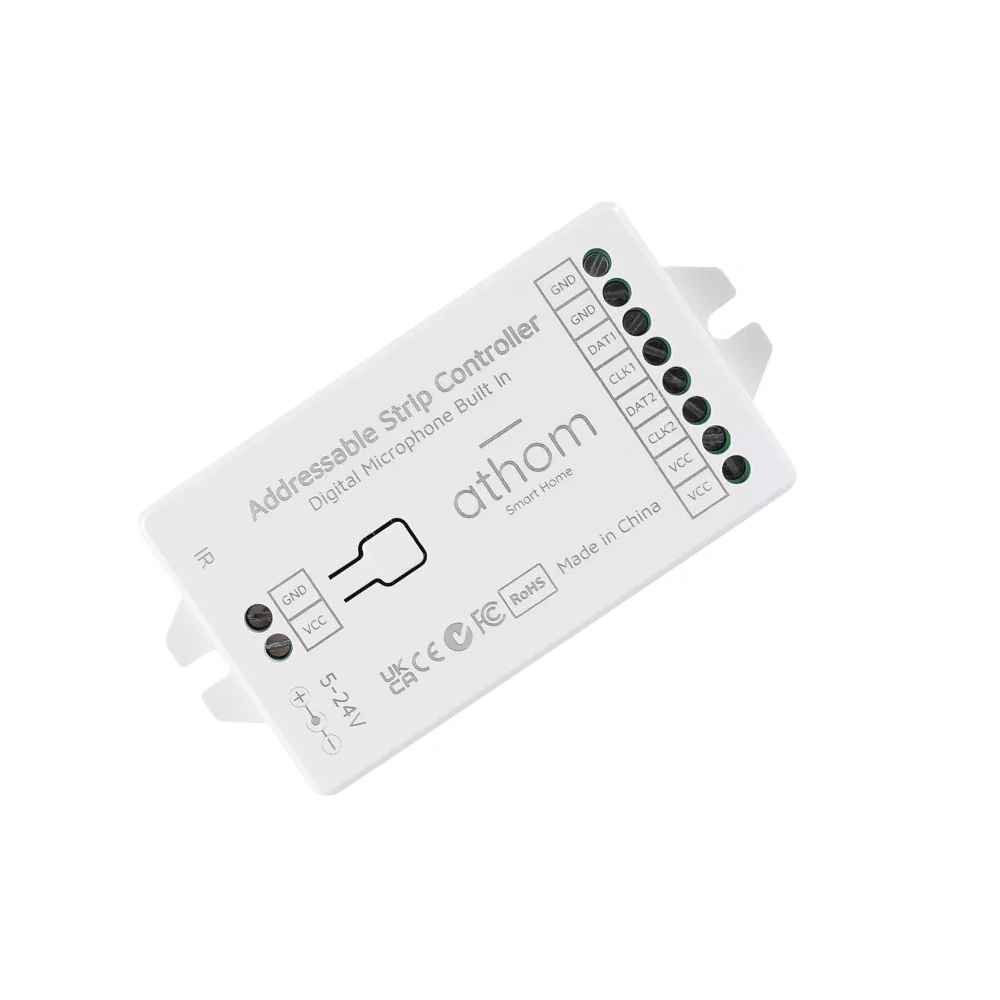
Manufacturer:
Athom.tech
Install method:
ota
| GPIO # | Component |
|---|---|
| GPIO00 | Button 1 |
| GPIO01 | User |
| GPIO02 | Relay 1 |
| GPIO03 | User |
| GPIO04 | User |
| GPIO05 | User |
| GPIO09 | User |
| GPIO10 | User |
| GPIO12 | User |
| GPIO13 | User |
| GPIO14 | User |
| GPIO15 | I2S WS IN1 |
| GPIO16 | User |
| GPIO17 | WS2812 2 |
| GPIO18 | WS2812 1 |
| GPIO19 | User |
| GPIO20 | None |
| GPIO21 | User |
| GPIO22 | User |
| GPIO23 | User |
| GPIO24 | None |
| GPIO25 | IRrecv |
| GPIO26 | User |
| GPIO27 | User |
| GPIO6 | None |
| GPIO7 | None |
| GPIO8 | None |
| GPIO11 | None |
| GPIO32 | I2S DIN1 |
| GPIO33 | User |
| GPIO34 | User |
| GPIO35 | User |
| GPIO36 | User |
| GPIO37 | None |
| GPIO38 | None |
| GPIO39 | User |
{"NAME":"Athom LS8P","GPIO":[32,1,224,1,1,1,1,1,1,1,1,7904,1,1377,1376,1,0,1,1,1,0,1088,1,1,0,0,0,0,7872,1,1,1,1,0,0,1],"FLAG":0,"BASE":1}Comes pre-flashed with WLED but easy to flash with Tasmota using the web UI upgrade option.
I2S PDM Digital Microphone Built in, IR Remote Control (optional)
Flashing Tasmota
The Athom device comes pre-flashed with WLED. It is easy to flash Tasmota instead - no soldering required.
Step 0. Download the standard Tasmota32 firmware from here: http://ota.tasmota.com/tasmota32/tasmota32.bin
Step 1. Power the device, connect the Wi-Fi AP with a laptop. It should be called WLED_0xxxxxx. If you see an auto-connect page, close it.
Step 2. Connect to http://4.3.2.1/ you should see the WLED Admin page. Click on TO THE CONTROLS
Step 3. Click on Config (wheel). Then click on Security & Updates at the bottom of the page.
Step 4. Click on Manual OTA Update. Click on Choose a File and select the tasmtoa32.bin file.
Step 5. Click on the Update! button to flash Tasmota. Wait 20s for the device to reboot.
Now Tasmota is flashed on the device. Go through the normal configuration process of Tasmota (connect to Wi-Fi tasmota-xxxxxx-yyyy)
To finish configuration, click on Configuration then Auto-configuration. Select Athom Adressable LED in the dropdown, click on Apply configuration. Confirm the reboot and click on Ok.
Migrating to Safeboot partition layout
Once Tasmota restarts, it’s still using the original partition layout, and not the Safeboot layout.
If you want to setup the new Safeboot partition layout follow the steps below:
- Download the Partition Wizard app, in the Console type
UrlFetch https://raw.githubusercontent.com/arendst/Tasmota/development/tasmota/berry/modules/Partition_Wizard.tapp. It should returnRESULT = {"UrlFetch":"Done"} - Restart the device
- Click on
Consoles, thenPartition Wizard. - Click on the red button
Start migrationwith default parameters - Wait for 5 minutes
- Reconnect to the device. You are good now…
Using the device
The Athom device has a Relay to power off the LED strips and reduce power consumption when the LEDs are not used. Using WS23812 LEDs needs the first relay to be On
Also check on ArtNet support