


Available from:
Aliexpress.com
Manufacturer:
Iwoole.com
Install method:
USB to Serial
| GPIO # | Component |
|---|---|
| GPIO00 | None |
| GPIO01 | None |
| GPIO02 | None |
| GPIO03 | None |
| GPIO04 | PWM 4 |
| GPIO05 | None |
| GPIO09 | None |
| GPIO10 | None |
| GPIO12 | PWM 2 |
| GPIO13 | PWM 3 |
| GPIO14 | PWM 1 |
| GPIO15 | None |
| GPIO16 | None |
| GPIO17 | None |
{"NAME":"GLOBELAMP","GPIO":[0,0,0,0,419,0,0,0,417,418,416,0,0,0],"FLAG":0,"BASE":18}This device cannot be flashed with tuya-convert anymore.
Serial Flashing
Disconnect the device from mains voltage!
Open the device. The plastic and aluminium halves can be separated by twisting the plastic part counter-clockwise. If you’re okay with a few scuffs you can also use a screwdriver (or a spudger) to seperate the two halves.
Remove the two screws holding the round plate with the LEDs. It is connected to the main PCB with a little cable. Make note of the orientation of this connection to ensure you reconnect it correctly later.
Carefully remove the heat-shrink tubing around the two main PCBs.
Like any ESP device, to flash this chip using serial you’ll need 3V3, GND, RX, TX and GPIO0
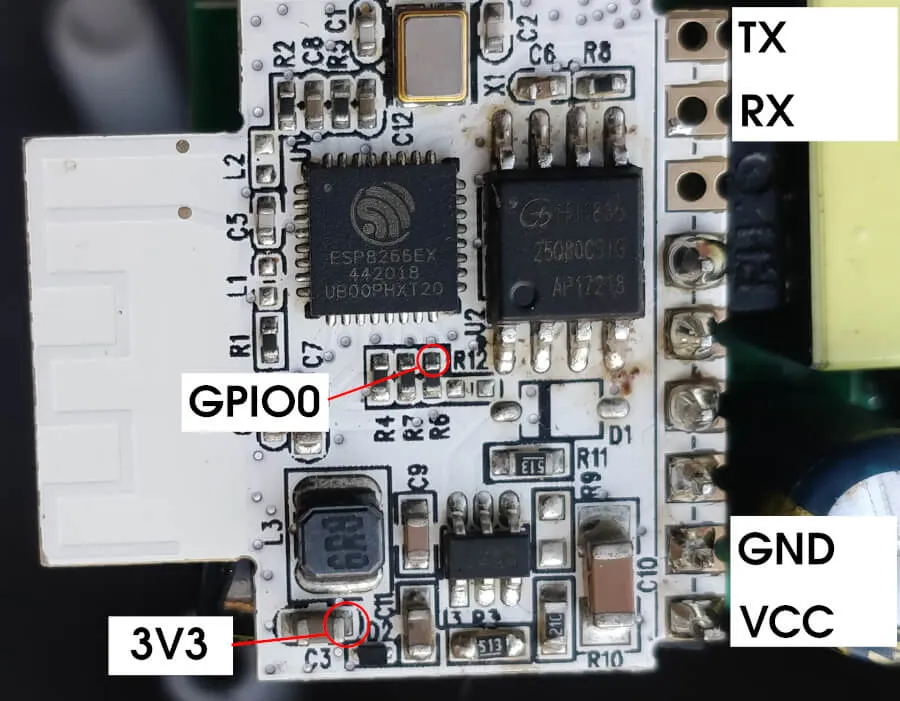
There are pads available for 3V3 and GPIO0 on the back. I have tried to find easier solder points on the front, marked in the image above. Be aware that VCC does not carry 3V3, but over 20 volts as far as I can tell.

Flash the chip as you would with any other.
Re-apply some heat-shrink tubing or cover the PCBs in electrical tape. Re-connect the LEDs (see cable orientation in image above).
Screw down the LEDs and close the device.
Contributed by Deinara