Available from:
Aliexpress.com
| GPIO # | Component |
|---|---|
| GPIO00 | None |
| GPIO01 | Tuya Tx |
| GPIO02 | None |
| GPIO03 | Tuya Rx |
| GPIO04 | None |
| GPIO05 | None |
| GPIO09 | None |
| GPIO10 | None |
| GPIO12 | None |
| GPIO13 | None |
| GPIO14 | None |
| GPIO15 | None |
| GPIO16 | None |
| GPIO17 | None |
{"NAME":"MY-KCL01800FB","GPIO":[0,2272,0,2304,0,0,0,0,0,0,0,0,0,0],"FLAG":0,"BASE":54}
Please read TuyaMCU to understand the terminology and configuration process.
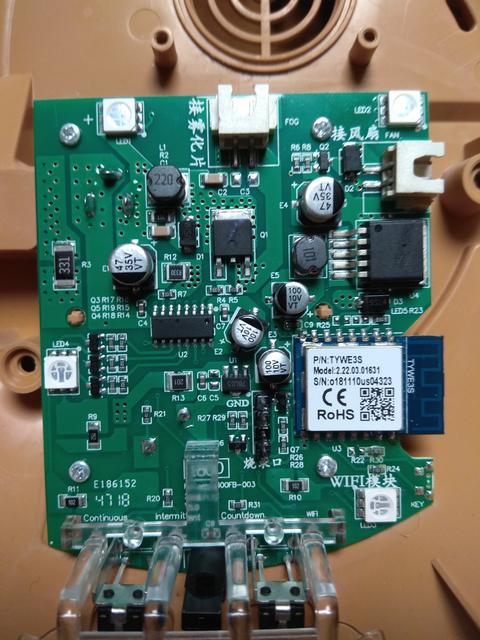
Flashed via serial by using TYWE3S pins. Might work with Tuya Convert.
Tuya Product ID: GQxEe5orh45cMgA61.0
PCB code: KCL-M1801C_M 2018_11_12 V5.0
Functions
dpID 2 device mode: 0 = off / 1 = continuous / 2 = intermittent / 3 = timer
dpID 4 set timer (180 min max) not needed with Tasmota, there’s a Timer function
dpID 6 light control: 0 = off / 1 = rgb cycle / 2 = white / 3 = single color
dpID 7 led dimmer
dpID 8 led color: 14 char value in hex (can define only RGB and send HSV value as max: RRGGBBffff6464)
dpID 9 error notification: 70 = ok / 1 = error
dpID 101 mist strength: 0 = low / 1 = high
I found the built in buzzer very annoying and desoldered it for quieter operation!
Configuration
After applying the template and configuring Wi-Fi and MQTT issue
Backlog TuyaMCU 21,7; TuyaMCU 24,8; TuyaMCU 11,111; TuyaMCU 11,112; TuyaMCU 63,2; TuyaMCU 62,6; TuyaMCU 61,101;
After a restart issue additional configurations:
Backlog TuyaRGB 3; DimmerRange 1,255; LedTable 0; TuyaEnumList 1,1; TuyaEnumList 2,3; TuyaEnumList 3,3; Rule0 1
Since fan and light control are type4 dpId’s they cannot be directly mapped to a relay. Instead we created two dummy relays (TuyaMCU 11,111 and TuyaMCU 13,113) which are then controlled using rules that convert relevand dpId statuses (dpId2 for fan power and dpId6 for light). Last rules takes the error (dpId9) states and sends them to a separate error topic which can be use in Home Automation systems.
Rule1
on power1#state do tuyaenum3 %value% endon
on power2#state=0 do tuyaenum2 0 endon on power2#state=1 do tuyaenum2 3 endon
on tuyareceived#dptype5id9 do publish stat/%topic%/error %value% endon
on tuyareceived#dptype4id101==1 do publish stat/%topic%/fanmode high endon on tuyareceived#dptype4id101==0 do publish stat/%topic%/fanmode low endon
on tuyareceived#dptype4id6==3 do power2 1 endon on tuyareceived#dptype4id2==3 do tuyaenum3 1 endon
on tuyaenum3#data==0 do power1 0 endon
on tuyareceived#dptype4id2!=0 do power1 1 endon
on scheme#data!=0 do backlog0 scheme 0; tuyaenum2 1 endon
Label webUI buttons:
Backlog WebButton1 Fan; WebButton2 Light; FriendlyName1 Diffuser Fan; FriendlyName2 Diffuser Light
What you get
Power1is device power status (dummy relay uses rules to control TuyaEnum3)Power2is a standard RGB light (power state uses rules to control TuyaEnum2)TuyaEnum3is fan power and modesTuyaEnum2is light power and modesTuyeEnum1is mist strength status and control
Home Assistant configuration
Make sure Rule1 is implemented and active before proceeding.
Use blueprint import button then create an automation from the blueprint which will send MQTT discovery payloads to Home Assistant. New entities should appear under the same Device Card in Tasmota integration.

Editing configuration.yaml
fan:
  - platform: mqtt
    name: "Diffuser"
    state_topic: "stat/%topic%/RESULT"
    state_value_template: "{% if value_json.POWER1 is defined %}{{ value_json.POWER1 }}{% endif%}"
    command_topic: "cmnd/%topic%/POWER1"
    preset_modes:
    -  "high"
    -  "low"
    preset_mode_state_topic: "stat/%topic%/fanmode"
    preset_mode_command_topic: "cmnd/%topic%/tuyaenum1"
    preset_mode_command_template: '{{ 1 if value == "high" else 0 }}'
    availability_topic: "tele/%topic%/LWT"
    payload_available: "Online"
    payload_not_available: "Offline"

binary_sensor:
  - platform: mqtt
    name: "Difuser Error"
    state_topic: "stat/%topic%/error"
    value_template: "{{ 'ON' if value != '0X00' else 'OFF' }}"
    device_class: problem
    availability_topic: "tele/%topic%/LWT"
    payload_available: "Online"
    payload_not_available: "Offline"
PCB