


Available from:
Amazon.de
Banggood.com
Aliexpress.com
Geekmaxi.com
Manufacturer:
Zhimi.com
Install method:
USB to Serial
| GPIO # | Component |
|---|---|
| GPIO00 | None |
| GPIO01 | None |
| GPIO02 | None |
| GPIO03 | None |
| GPIO04 | None |
| GPIO05 | None |
| GPIO09 | None |
| GPIO10 | None |
| GPIO12 | None |
| GPIO13 | None |
| GPIO14 | None |
| GPIO15 | None |
| GPIO16 | None |
| GPIO17 | Serial Tx |
| GPIO18 | Serial Rx |
| GPIO19 | None |
| GPIO20 | None |
| GPIO21 | None |
| GPIO22 | None |
| GPIO23 | None |
| GPIO24 | None |
| GPIO25 | None |
| GPIO26 | None |
| GPIO27 | None |
| GPIO6 | None |
| GPIO7 | None |
| GPIO8 | None |
| GPIO11 | None |
| GPIO32 | None |
| GPIO33 | None |
| GPIO34 | None |
| GPIO35 | None |
| GPIO36 | None |
| GPIO37 | None |
| GPIO38 | None |
| GPIO39 | None |
{"NAME":"ZNNFJ07ZM","GPIO":[0,0,0,0,0,0,0,0,0,0,0,0,0,3200,3232,0,0,0,0,0,0,0,0,0,0,0,0,0,0,0,0,0,0,0,0,0],"FLAG":0,"BASE":1}
Serial Flashing
Remove the back dust grill, unscrew 6 screws. Remove back plate which is clipped to the shell but it will snap out just by pulling using the handle on the top.
At the top of the heater is the ESP-WROOM-32D Wi-Fi module with everything neatly broken out and labelled on the side.
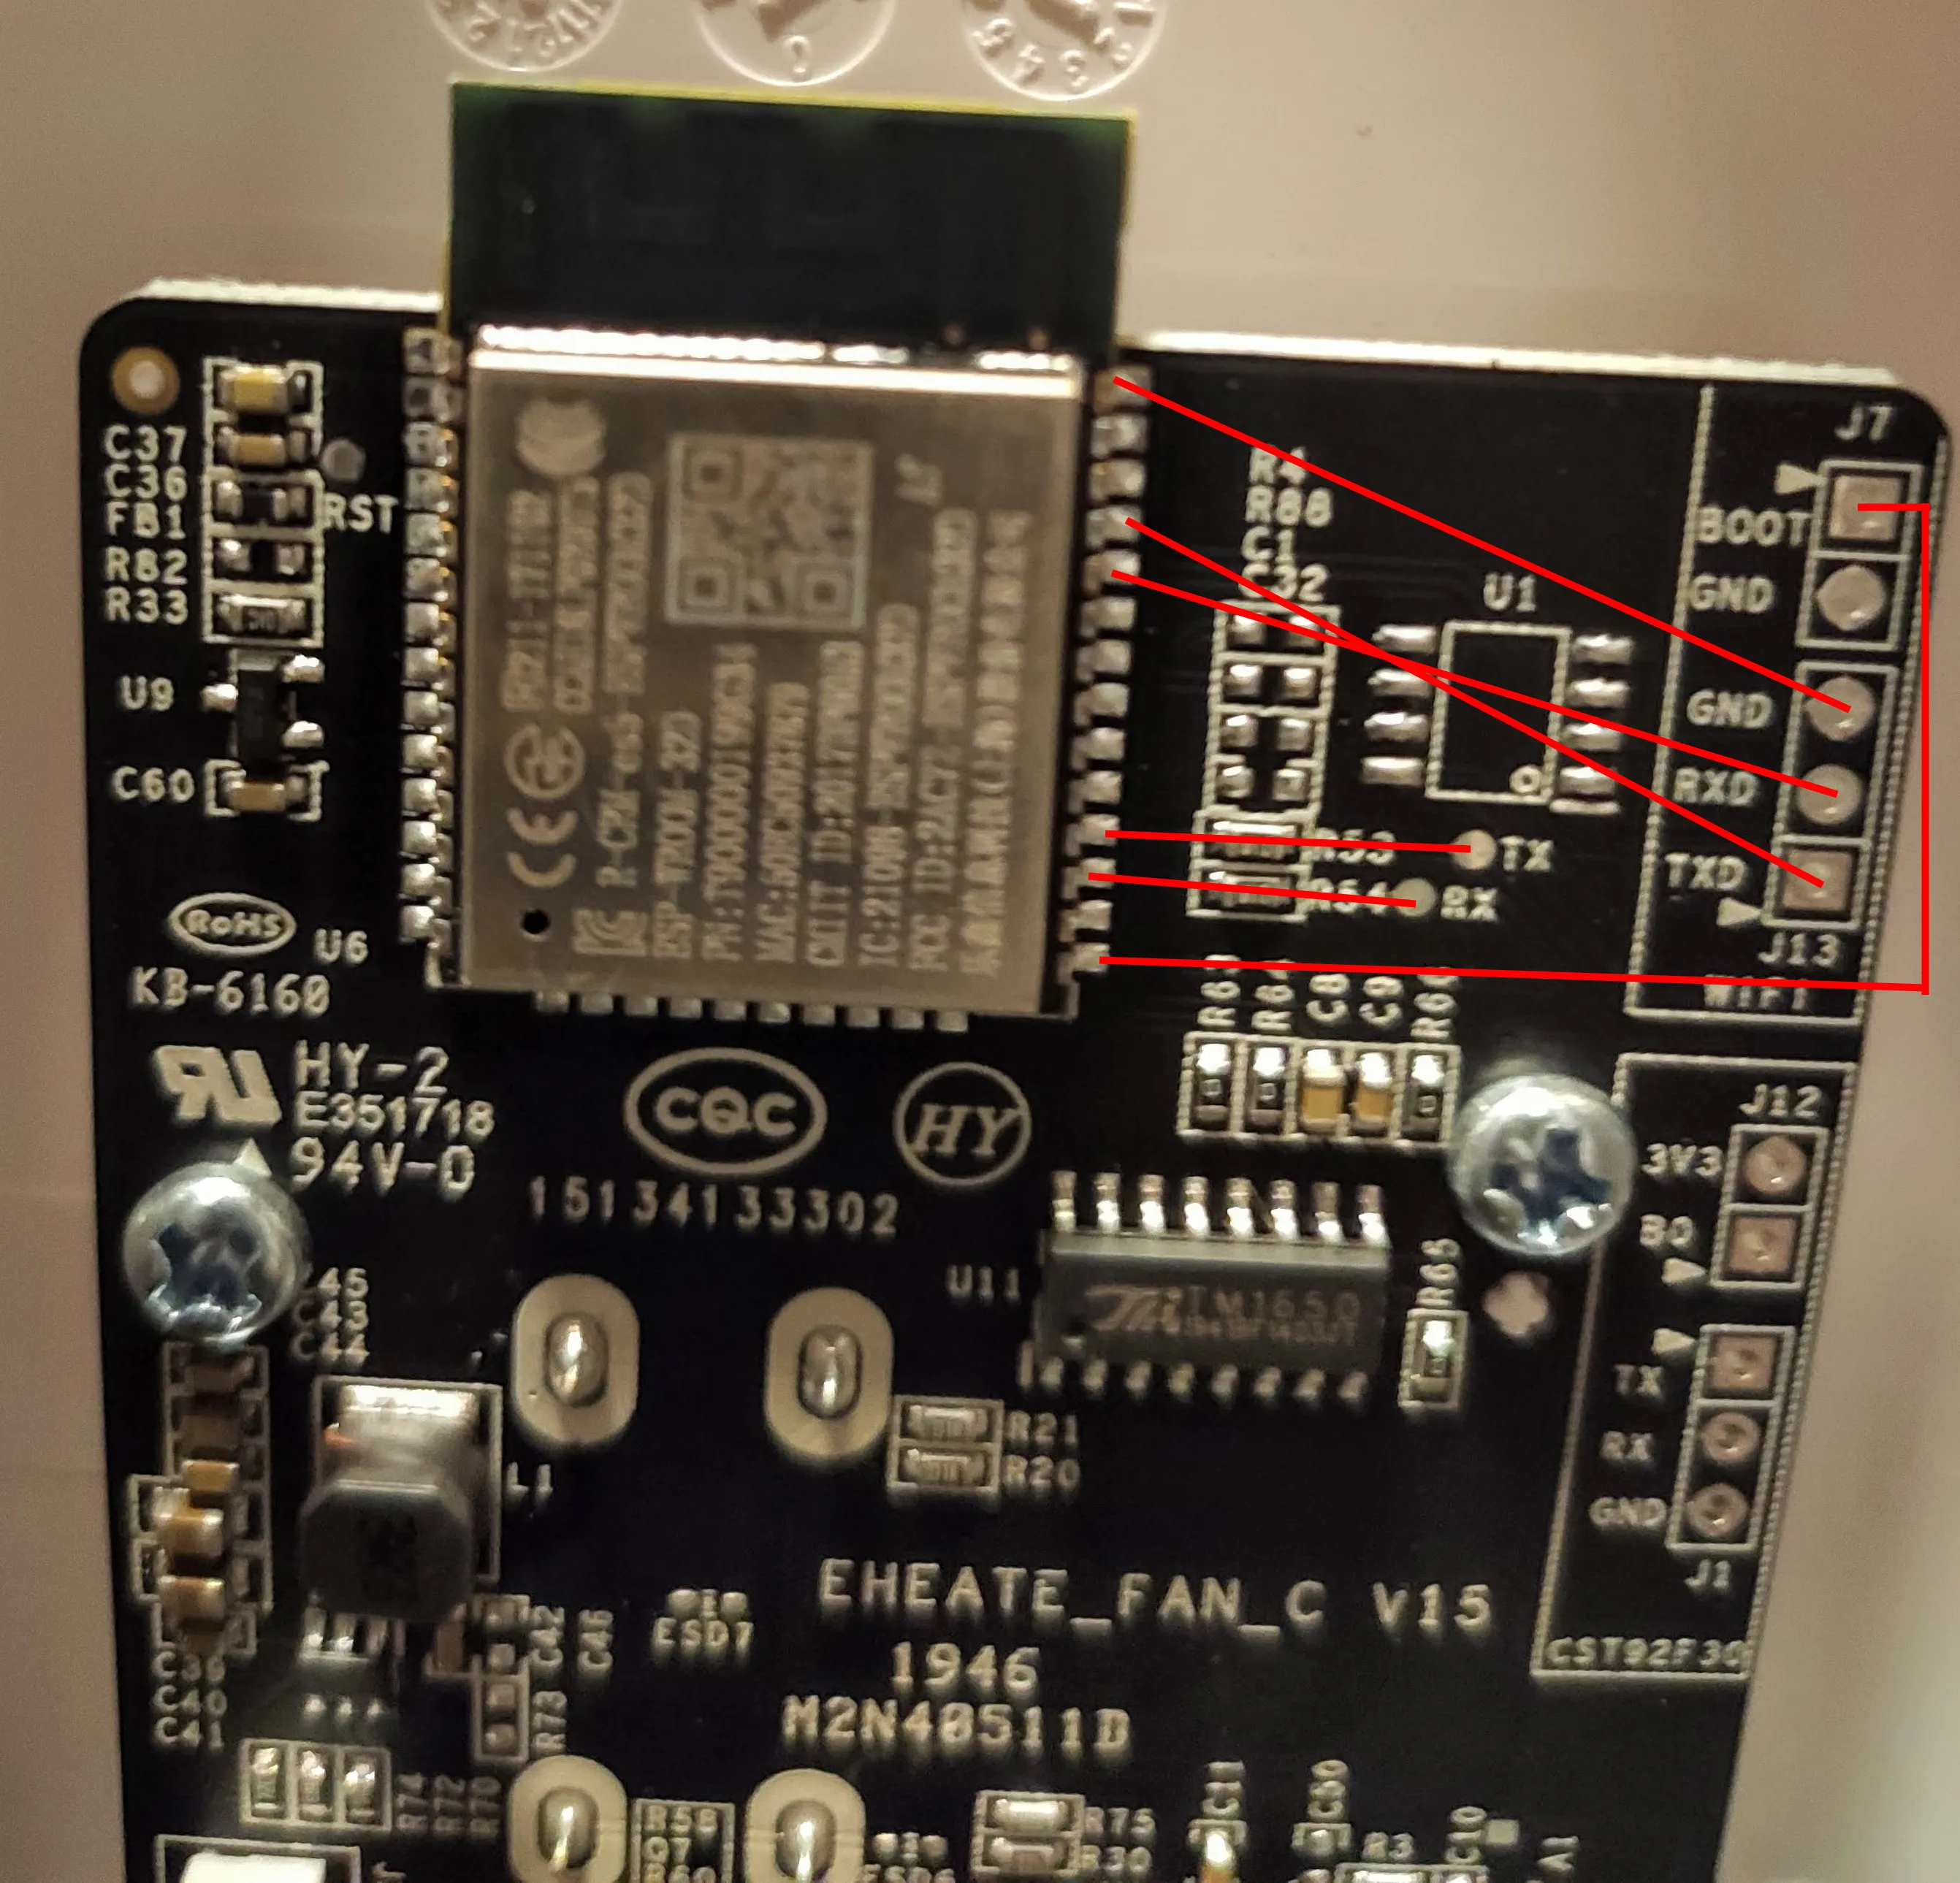
Connect the serial-to-USB adapter to TX, RX, GND and 3V3. Make sure to ground BOOT pin (GPIO0) to put the Wi-Fi module in flashing mode. Flash tasmota32solo1 binary. If the flash isn’t succeeding disable the MCU by connecting both J3 pins (RST and GND).
Configuration
After applying the template run a set of commands to configure the serial port:
Backlog SBaudRate 115200; SerialDelimiter 13; SerialBuffer 512; Rule1 1; Rule2 5;
Next you need a set of rules that will sent necessary replies to MCU queries:
rule1 on sserialreceived#data$<result do sserialsend3 down MIIO_net_change cloud\r endon on sserialreceived#data$<model do sserialsend3 ok\r endon on sserialreceived#data$<mcu_version do sserialsend3 ok\r endon on sserialreceived#data$<net do sserialsend3 cloud\r endon on sserialreceived#data$<time do sserialsend3 %time%\r endon on sserialreceived#data$<ble_config do sserialsend3 ok\r endon on tele-wifi#rssi do sserialsend3 down MIIO_net_change local\r endon on system#boot do serialbuffer 512 endon
Features
This heater is a part of Xiaomi’s MiOT ecosystem which uses a standardised MiOT protocol for communication with the MCU and Xiaomi cloud. More about the protocol here. You can ignore the MCU query posted every 500ms tele/smartmi/RESULT = {"SSerialReceived":"get_down \r"}
To control the device you send a down set_properties command using SSerialSend3. siid and piid target the feature you want with value. Finally every command line needs to end with a carriage return or \r.
siid piid |
possible values | description | |||
|---|---|---|---|---|---|
2 2 |
true/false | Switch status | |||
2 3 |
1/2 | Heat level (1 = high, 2 = low) | |||
2 4 |
0/1 | Fan mode (0 | not swinging, 1 | swinging) | |
3 1 |
true/false | Beeper sound | |||
4 1 |
0/1/2/4/8 | Countdown timer in hours | |||
6 1 |
0/1/2 | LED brightness (0 | bright, 1 | low, 2 | off) |
7 1 |
true/false | Child lock | |||
8 1 |
0/15/1 | Button click (notify only) | |||
8 3 |
true/false | Return fan to middle position when turning off |
For example, to turn the heater on send
sserialsend3 down set_properties 2 2 true\r
or change LED brightness to low
sserialsend3 down set_properties 6 1 1\r
If a property has changed from previous state it will report as:
{“SSSerialReceived”:”properties_changed 6 1 1\r”}
Rule1 has some actions to ensure status updates are polled periodically which are reported to
{“SSerialReceived”:”properties_changed 2 2 true 2 1 0 2 3 2 2 4 0 8 1 0 3 1 false 4 1 0 6 1 0 7 1 false 8 3 true\r”}
To read the status of all functions and status changes we need to parse it manually. It is possible to program full support for this device with Berry but I opted to forward the status to MQTT and parse it outside (in my case: Home Assistant).
rule2 on sserialreceived#data$<properties_changed do publish %topic%/changed_properties %value% endon
Full MiOT spec in formatted JSON grabbed from miot-spec.org.
Home Assistant
First create this automation which will reformat the MiOT output into a JSON MQTT message to %topic%/properties:

Next create an autodiscovery automation to create the Heater climate entity and two switches for child lock and sound control.